How to Set Up a Montessori Shelf at Home: Step by Step
Setting up a Montessori shelf is one of the simplest and most impactful changes you can make to your home environment. It takes about an hour, costs less than you’d expect, and fundamentally changes how your child interacts with their toys and materials.
No, you don’t need to be a Montessori expert. No, your home doesn’t need to look like a catalogue. Here’s how to do it properly.
Why a Shelf Instead of a Toy Box?
Think about how toy boxes work: everything’s dumped in together, the child digs around looking for something, pulls out half the contents, gets overwhelmed, and plays with nothing. Or they find one thing at the bottom and ignore the avalanche they just created.
A shelf changes the dynamic completely.
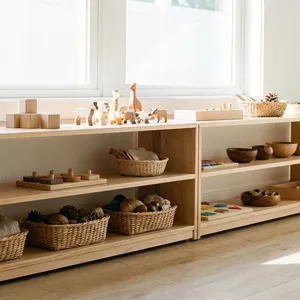
When materials are displayed individually on a low, open shelf, the child can see their options. They can choose deliberately. They can take one thing, use it, and return it. This builds independence, concentration, and a sense of order — all core Montessori principles.
It’s not about aesthetics (though it does look nice). It’s about respecting the child’s ability to make choices and manage their own space.
Step 1: Choose Your Shelf
The shelf needs to be low enough for your child to access independently and open (no doors, no bins they can’t see into).
What to look for:
- Height: Top shelf should be reachable by your child without stretching or climbing
- Depth: Deep enough for a tray or basket (about 25-30 cm)
- Stability: It must be wall-anchored. Non-negotiable. Children will pull on shelves.
- Material: Wood is ideal. Solid, natural, and fits the Montessori aesthetic. But a sturdy white shelf works perfectly fine.
Recommended shelves:
IKEA KALLAX (1×4 horizontal) — ~€50 The workhorse of Montessori home setups. Lay it on its side for a low, four-cube shelf. It’s sturdy, affordable, and available almost everywhere. The cubes are a good size for trays and baskets. Wall-anchor it.
IKEA FLISAT — ~€35 Designed as a children’s book display, but works beautifully as a low shelf. It’s the right height for toddlers and has a clean, simple design. Less storage than the KALLAX, but plenty for a focused selection.
Custom wooden shelf — €80-150 If you want something more polished, several Etsy sellers and small woodworking shops make Montessori-style shelving. You’ll pay more, but you get exactly what you want. Look for untreated or naturally finished wood. The Montessori Bookshelf for Toddlers (~$99) in birch plywood is a front-facing option worth considering if you want something purpose-built.
What we use: A KALLAX on its side, wall-anchored, in the living room. It cost €50 and has held up to everything our toddler has thrown at it (literally).
Step 2: Decide What Goes On It
This is where most people overthink it. The rule is simple: fewer items, better engagement.
How many items?
- Babies (6-12 months): 3-4 items on the shelf
- Toddlers (1-3 years): 4-6 items
- Preschoolers (3-6 years): 6-8 items
That’s it. If your child has 40 toys, 6 go on the shelf and 34 go in storage. This sounds extreme until you see how much more deeply your child engages with each thing when they’re not drowning in options.
What kind of items?
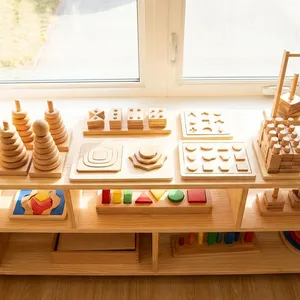
Aim for a mix across different areas of development:
- Fine motor: Threading beads, puzzles, posting boxes — the Montessori Object Permanence Box (~$18) is a shelf classic for 6–18 months
- Gross motor: Balls, push toys (stored nearby, not on the shelf); the Hape Country Critters 5-Sided Play Cube (~$55) works as a low activity station beside the shelf
- Practical life: Pouring set, child-sized broom, cutting activity
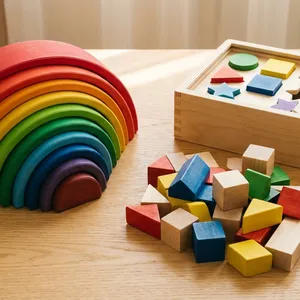
- Sensorial: Colour sorting, texture materials, sound containers; the Hape Double Bubble Bead Maze (~$22) is self-contained and ideal for independent play on a shelf
- Language: Books (on a separate forward-facing display), picture cards, miniature objects
- Creative: Crayons and paper, playdough, watercolours
You don’t need every category represented at once. Just aim for variety. Not sure what to stock? Our complete guide to Montessori toys by age breaks down the best materials for each developmental stage.
Presentation matters
Each item should be on a tray, in a basket, or self-contained. The tray defines the activity space — the child takes the tray to a table or mat, uses the material, and returns the whole tray. This structure helps children understand beginnings and endings, and keeps pieces from getting mixed up.
Good trays: small wooden or bamboo trays from IKEA (the OSTBIT range), thrift stores, or kitchen supply shops. You don’t need anything fancy.
Step 3: Set Up the Space
Placement
Put the shelf where your child spends time. Living room, playroom, bedroom — wherever the natural activity happens. Don’t put it in a room the child rarely uses and expect them to seek it out.
Floor space
Leave open floor space in front of the shelf. Children need room to spread out, use a work mat, or sit on the floor with their materials. A shelf against a wall with a clear 1-2 metre space in front is ideal.
Work mat
A small mat or rug (about 60×90 cm) serves as a workspace on the floor. The child unrolls it, places their activity on it, works, then rolls it up and returns it. The mat defines personal space and signals “I’m working here” to siblings, pets, and parents who might be tempted to interrupt.
Lighting
Natural light is best. If the shelf is in a darker area, a simple lamp nearby helps. Children are drawn to well-lit spaces.
Keep it at their level
Artwork, mirrors, and hooks should also be at child height. A small mirror next to the shelf lets the child see themselves. Low hooks let them hang their own bag or apron. The entire area should say: “This space is yours.”
Step 4: Introduce It to Your Child
Don’t just set up the shelf and walk away. Show your child how to use it.
For toddlers: Sit with them. Take one tray from the shelf. Show them — slowly, without talking too much — how to use the material. Then return it to its spot. Let them try. If they’re not interested, that’s fine. Leave it available and try again another day.
For older children: Explain the system. “These are your materials. You can choose any one to work with. When you’re done, put it back so it’s ready for next time.” Most children over 3 grasp this immediately and love the responsibility.
The return rule: This is the hardest habit to build and the most important. Materials go back on the shelf before choosing something new. It takes weeks of gentle, consistent reminding. Be patient. It’s worth it.
Step 5: Rotate Materials
Rotation is what keeps the shelf alive. Every 1-2 weeks, swap out a few items for things from storage.
How to rotate:
-
Observe first. Watch what your child gravitates toward and what they ignore. Don’t rotate out something they’re actively using — even if they’ve been doing the same puzzle for three weeks straight. Repetition is how children master skills.
-
Remove what’s ignored. If something hasn’t been touched in a week, swap it out. It might come back in a month when the child is developmentally ready for it.
-
Introduce one new thing at a time. Don’t overhaul the entire shelf. Change 1-2 items. This keeps things fresh without creating chaos.
-
Follow the child’s interests. If your child is obsessed with animals, add an animal sorting activity like the Melissa & Doug Farm Animals Jumbo Knob Puzzle (~$12). If they’re fascinated by water, introduce a pouring exercise — we have 10 Montessori activities for 18-month-olds that work perfectly on a shelf rotation. The shelf should reflect their current developmental moment.
-
Increase difficulty gradually. A 3-piece puzzle becomes a 6-piece. Large threading beads become smaller ones. Single-colour sorting becomes multi-category. The Fat Brain Toys Tobbles Neo (~$25) stacking spheres grow in challenge as balancing skills improve. Follow their competence.
Storage system
Keep non-shelf materials in a closed cupboard or closet that the child can’t see into. Out of sight is important — you want the shelf to be the curated selection, not one of many options. Label bins or boxes so you can quickly find things during rotation.
Common Mistakes (and How to Avoid Them)
Too many things on the shelf. The most common mistake. If in doubt, remove something. An uncluttered shelf with 4 items will get more use than a packed shelf with 12.
Putting everything in baskets. Baskets are great for collections (blocks, figurines), but individual activities should be visible. A posting box hidden in a basket won’t get used. If the child can’t see what it is without digging, it defeats the purpose.
Getting precious about mess. Children will mix things up, drop pieces, and put things back in the wrong spot. That’s fine. Guide them, but don’t hover. The goal is independence, not perfection.
Not anchoring the shelf. Wall-anchor every shelf. Every single one. No exceptions. Children climb.
Making it too “Montessori.” You don’t need matching wooden everything in muted earth tones. A KALLAX with a few trays from the kitchen and toys you already own is perfectly valid. The principle is what matters, not the aesthetic.
Frequently Asked Questions
What age should I start a Montessori shelf?
You can start as early as 3-4 months with a few simple items displayed on a low shelf or mat at floor level. At this age, it’s about visual access to interesting objects. The full shelf setup becomes more relevant from about 8-10 months, when children start pulling to stand and can access items independently.
Do I need to buy all new toys?
No. Look at what you already have and select the best items. A good wooden puzzle you already own is better than a new one you bought just to fill the shelf. You’ll likely want to add a few things over time, but start with what’s already in the house.
What if my child pulls everything off the shelf at once?
This is normal, especially in the first week or two. They’re testing the system (and your reaction). Calmly help them put things back. Show them: “We take one thing at a time.” It takes repetition, but most children learn the pattern within 2-3 weeks.
Can siblings share a shelf?
Yes, but give each child their own section or shelf. A shared shelf with mixed-age materials leads to frustration (the toddler grabs the preschooler’s bead work; the preschooler finds the baby rattle boring). Separate spaces, clearly defined, work best.
What about books?
Books deserve their own display — ideally a forward-facing shelf or wall-mounted book ledge where covers are visible. Children choose books by their covers, not their spines. Rotate books just like you rotate toys: 5-8 books at a time, swapped weekly.
How do I handle the toys that don’t fit the shelf system?
Large items (ride-on toys, play kitchen, climbing triangle) live wherever they fit and don’t need shelf rotation. The shelf is for smaller, focused activities. Not everything in your home needs to be “Montessori-fied.” Give yourself permission to have a normal house with one intentional shelf.
 Get weekly Montessori tips
Honest reviews, activity ideas, and budget-friendly picks — no spam, just what works.
Subscribe Free