Montessori Kitchen Activities for Toddlers: Practical Life Skills They'll Love
Your toddler watches you cook dinner every single night. They lean over the counter, try to grab the spoon, drag over a chair to stand on, and look at you with the kind of intensity that only appears when something really matters to them.
They’re not being difficult. They’re telling you they want to participate.
The kitchen is one of the richest Montessori environments in your home — and it costs nothing to unlock. Real ingredients, real tools, real outcomes. A banana peeled and eaten. A salad washed and placed on the table. A simple dough kneaded and baked. For a toddler, this is deeply meaningful work.
This guide covers 10 specific kitchen activities, age ranges for each, what equipment genuinely helps, and how to keep it safe without draining all the joy out of it.
Why the Kitchen Works So Well
Most Montessori activities require some setup — a tray, special materials, a prepared space. Kitchen activities are different. They’re embedded in your daily life. They have a natural beginning (time to make lunch) and a clear ending (we eat it). The result is immediately visible and meaningful.
They also develop an extraordinary range of skills simultaneously:
- Fine motor control — gripping, pinching, pressing, spreading, stirring
- Hand-eye coordination — pouring, cutting, measuring
- Concentration — multi-step tasks that require sustained attention
- Sequencing — first we wash, then we cut, then we mix
- Maths foundations — counting, measuring, comparing quantities
- Language — names of ingredients, tools, actions, sensory descriptions
- Independence and self-confidence — “I helped make this”
No single toy delivers all of that. A real kitchen task does.
For a broader overview of practical life in Montessori, see our full guide: Montessori Practical Life Activities. If you’re just getting started with Montessori at home, How to Start Montessori at Home is a good place to begin.
What You’ll Need
You don’t need to buy anything to start. Most of what works in a Montessori kitchen is already in your drawers. But if you want to invest in a few things that genuinely make a difference:
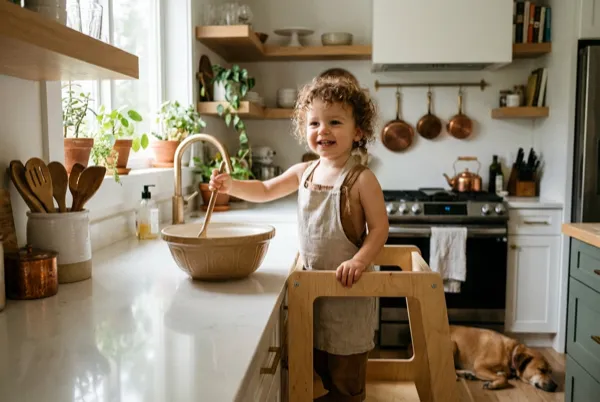
The game-changer — a learning tower or step stool
A learning tower brings your toddler to counter height safely, with guardrails. It transforms “watching from below” to “working alongside you.” This is the single most impactful kitchen purchase for a Montessori home.
The Guidecraft Kitchen Helper (~$120) is the classic — solid wood, adjustable height platform, safety rails on all four sides. It’s expensive, but it lasts for years and works from 18 months up to age 6. If the price is a barrier, a sturdy step stool works for a start. The learning tower is worth it if they’re going to use it daily.
Child-safe cutting tools
A standard butter knife works for soft foods. For anything firmer, a crinkle cutter or child-safe serrated knife gives children real cutting action without real cutting risk. The Montessori Kitchen Knife Set with Crinkle Cutter (~$18) includes serrated toddler knives, a crinkle cutter, and a cutting board — good value for ages 2+.
For age 3+ when they’re ready to use a proper (but safe) knife, the Opinel Le Petit Chef Set (~$35) is the Montessori favourite. Rounded tip, finger guard ring, beechwood handle. Made in France, built to last.
A small pitcher or jug
A 300ml pitcher lets children pour their own water or milk without a full litre of spillage potential. Any small jug from your kitchen works. Or look for a dedicated child-sized pitcher — ceramic or glass preferred (real materials, real consequences, real care).
A child-sized apron
Not required, but it’s a Montessori classic: wearing an apron signals “this is real work.” More practically, it protects clothes and gives children an independent routine (put on the apron before we start, take it off when we’re done).
Mixing bowls and tools you already own
A whisk, a wooden spoon, a small rubber spatula, measuring cups and spoons. You have all of these. Start there.
10 Montessori Kitchen Activities by Age
Here’s a quick overview of which activities work at which ages. Use it as a guide, not a rule — every child develops differently.
Activity by Age Guide
| Activity | 12–18m | 18–24m | 2–3y | 3–4y |
|---|---|---|---|---|
| Washing fruit & veg | ||||
| Pouring | ||||
| Tearing lettuce | ||||
| Spreading | ||||
| Crinkle cutter | ||||
| Whisking & mixing | ||||
| Peeling fruit | ||||
| Measuring & scooping | ||||
| Grating | ||||
| Simple baking |
1. Washing Fruit and Vegetables
Age: 12 months+
What you need: A large bowl or the sink, water, and some sturdy produce. Potatoes, carrots, apples, and courgettes are ideal — they handle enthusiastic washing. Strawberries and raspberries are less suitable (they disintegrate).
How it works: Fill a bowl with a few centimetres of water. Place the vegetables alongside it. Show your child how to pick up each vegetable, swish it in the water, and rub gently. Put it aside when clean. That’s it.
Why it works: At 12-18 months, this is primarily a sensory activity — the weight of vegetables, the temperature of water, the different textures. By 18-24 months it becomes purposeful: they understand they’re washing food for dinner. By 2+, they can do it entirely independently.
The connection to the meal matters. “You washed the carrots — let’s see them in the salad at dinner.” That loop between effort and result is deeply motivating.
What they’re building: Bilateral coordination (two hands working together), sensory discrimination, concentration, sense of contribution.
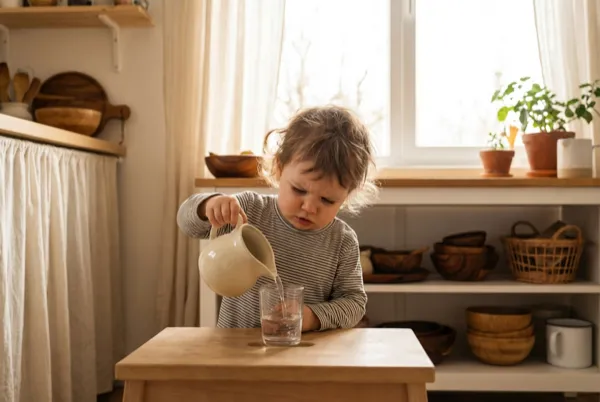
2. Pouring and Serving
Age: 15 months+
What you need: A small pitcher (filled no more than halfway), cups or glasses, a tray to catch spills.
How it works: Demonstrate pouring slowly from the pitcher into a cup — tilt, pour, stop before it overflows, set down. Then let them try. When the cup is full, they can pour it back. Or drink it. Or pour it into another cup.
Why it works: Pouring is the foundational Montessori kitchen activity. It’s endlessly repeatable, immediately satisfying, and develops precise wrist control. Start with dry materials (rice, lentils) before moving to water if you want to build the skill with less mess first.
Progression: One cup to another → into a row of smaller cups → pouring for other people at mealtimes (“Can you pour Daddy’s water?”). That last step — serving others — is a significant moment. They go from practising a skill to genuinely contributing.
The mess reality: A 300ml pitcher means 300ml of potential spills. A tray with a lip catches most of it. A sponge nearby lets them clean up independently. Accept the occasional puddle. It teaches more than a dry run ever could.
What they’re building: Wrist control, hand-eye coordination, concentration, independence.
3. Tearing Lettuce and Leafy Greens
Age: 18 months+
What you need: Leafy greens — lettuce, spinach, kale, chard. A large bowl.
How it works: Wash the leaves together (see activity 1). Then sit with a big bowl and tear the leaves into smaller pieces for the salad. Show them how to hold a leaf and tear gently. Step back. They’ll figure it out.
Why it works: Tearing is perfect for small hands that aren’t ready for cutting tools yet. It requires just enough resistance to be engaging, and the immediate feedback (the leaf tears, or it doesn’t) helps children calibrate their force naturally.
It’s also remarkably calming. Something about the texture and the tearing action holds attention well.
What they’re building: Bilateral hand use, fine motor control, care of the environment (using what they tear).
4. Spreading
Age: 18 months+
What you need: Bread or crackers, a spreading knife (butter knife or child-safe equivalent), and something to spread — butter, cream cheese, hummus, avocado, jam.
How it works: Put a small amount of spread in a bowl. Show how to scoop a little with the knife and spread it across the bread from the middle outward. Demonstrate a few times. Hand it over.
Why it works: Spreading requires controlled, sustained pressure — one of the more sophisticated motor skills for a toddler. They’ll dig holes in the bread at first, press too hard, pile everything in one corner. That’s the learning. By 2.5, most children can spread reasonably well without much bread destruction.
The upgrade: Once spreading is easy, move to banana slicing with a butter knife (soft enough to cut safely), then assembling their own snack plate — a cracker with spread, a few slices of fruit, maybe some cheese. They made their own lunch. That’s enormous.
What they’re building: Controlled pressure, bilateral coordination, sequencing, independence.
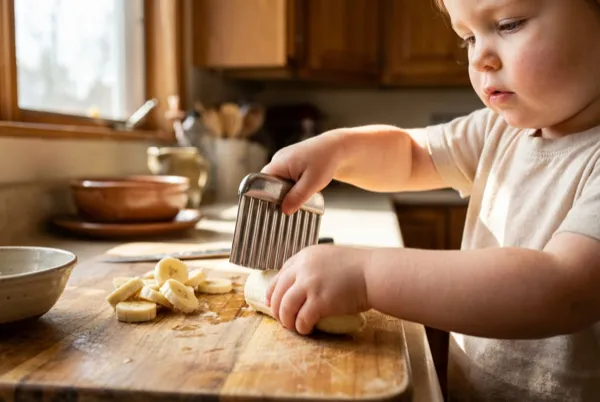
5. Using a Crinkle Cutter
Age: 2 years+
What you need: A crinkle cutter (the wavy-bladed one that makes fancy-edged cuts), a cutting board, and soft fruits or vegetables. Bananas, strawberries, soft cooked carrots, cucumber, and kiwi (halved) all work well.
How it works: Place the food on a cutting board. Show how to hold the crinkle cutter with both hands and press down through the food in a rocking motion. The wavy blade does most of the work — it’s much safer than a regular knife because it grips the food. Let them cut.
Why it works: This is the bridge between “no cutting tools” and “real knife.” The crinkle cutter feels like a proper kitchen tool, produces a visible result (wavy-edged banana slices!), and is genuinely safe for age 2+. It’s also immediately satisfying — the food actually cuts, and what they cut goes on the plate.
What to expect: They’ll press unevenly. Slices will be wildly different sizes. Some pieces will be mashed rather than cut. All of this is fine. The motor skill is being refined through repetition.
What they’re building: Bilateral hand strength, controlled force, sequencing, spatial awareness.
6. Whisking and Mixing
Age: 2 years+
What you need: A bowl, a whisk or large spoon, and something to mix. Scrambled eggs (beaten before cooking), pancake batter, salad dressing, a simple cake mix.
How it works: Crack the egg into the bowl (let them try cracking — it usually takes a few attempts and some shell fishing). Add any other ingredients. Show the whisk motion. Hand it over. They will whisk enthusiastically for longer than you’d expect.
Why it works: Whisking is a sustained circular motion that requires shoulder, arm, and wrist coordination working together. It’s also deeply satisfying — you can see and hear the mixture changing. And it’s a classic kitchen task that children know is “real cooking.”
For baking, involve them in measuring first (see activity 8). The sequence — measure, combine, mix — teaches that cooking has steps and order.
A note on eggs: Most children are fascinated by raw eggs. The slippery membrane, the way the yolk sits in the white, the way it slides. Let them observe, touch (wash hands after), and explore. Sensory experience first, cooking skill second.
What they’re building: Arm and wrist coordination, concentration, understanding of cause and effect.
7. Peeling Fruit
Age: 2 years+
What you need: Bananas, clementines, or satsumas (easiest). Hard-boiled eggs (more challenging, more satisfying).
How it works: For a banana: start the peel at the top and let them pull it down. For a clementine: push your thumbnail into the top to get them started, then let them peel the rest. For eggs: show how to tap gently on the counter to crack the shell, then roll, then peel from where the shell starts to separate.
Why it works: Peeling requires sustained fine motor effort and good proprioceptive feedback — children learn how much pressure breaks the peel vs. the fruit. It also has an incredibly clear beginning, middle, and end. The reward is immediate and edible.
What they’re building: Fine motor control, sustained concentration, task completion.

8. Measuring and Scooping
Age: 2.5 years+
What you need: Measuring cups and spoons, dry ingredients (flour, oats, rice), and something to measure into. A baking recipe gives this real purpose.
How it works: When baking, let your child measure and pour the dry ingredients. Show how to fill a measuring cup, level it off with a straight edge, and tip it into the mixing bowl. For smaller measurements, demonstrate filling a teaspoon without overflow.
Why it works: Measuring introduces mathematical concepts in a completely concrete, meaningful context. “We need two cups” means something when they’re scooping the cups themselves. “Half a teaspoon” is tangible when they feel how little it is.
This is also a real contribution to the meal. If they measure wrong, the recipe changes — which is fine, and teaches consequences in the most benign possible way.
Progression: Dry ingredients first (no mess). Then liquids (use a measuring jug on a flat surface). Eventually, reading the measurement markings on a jug.
What they’re building: Mathematical foundations (quantity, comparison, fractions), concentration, contribution.
9. Grating Cheese or Vegetables
Age: 3 years+
What you need: A box grater or flat grater, a block of cheese or a firm vegetable (carrot, courgette, apple). A bowl to catch the gratings. A damp cloth for clean-up.
How it works: Demonstrate first: hold the grater steady with one hand, move the food downward in controlled strokes. Show the guard position — fingers curled back. Let them try. Stay close for this one.
Why it works: Grating requires sustained back-and-forth motion with one hand while the other holds the grater steady — complex bilateral coordination. The food literally disappears as they work, which is visually fascinating. And grated cheese on pasta that they grated themselves tastes better. This is a scientific fact.
Safety note: Keep this one well-supervised. The grater is the first kitchen tool in this list where a real scrape is genuinely possible. Teach finger position carefully. Some parents use a cut-resistant glove for the hand holding the food. It’s not un-Montessori to use protective equipment — it’s practical.
What they’re building: Bilateral coordination, controlled force, concentration, spatial awareness.
10. Simple Baking Preparation
Age: 3 years+
What you need: A recipe. All the ingredients. Child-sized tools or adapted adult ones.
How it works: Choose something simple — banana bread, oat biscuits, scones, pancakes. Let your child do as much of the process as possible: measuring (activity 8), mixing (activity 6), pouring into the tin, and the ceremonial placing in the oven (you do the actual oven part).
Why it works: Baking is a multi-step process with a clear beginning, middle, and end, and a result that everyone can enjoy. It ties together almost every earlier skill — measuring, pouring, mixing, spreading the batter. And the smell of something baking is one of childhood’s best memories.
The waiting part: Baking involves waiting, which is genuinely hard for toddlers. Use the wait productively: clean up the bowls, wash the utensils, set the table. The wait becomes part of the sequence.
Start simple: Banana bread is nearly impossible to ruin and uses overripe bananas that would otherwise go to waste. Three-ingredient oat biscuits (oats, banana, a little honey) are a 10-minute project from start to oven. Build complexity gradually as their attention span and skill grow.
What they’re building: Multi-step planning, mathematical foundations, patience, teamwork, pride of contribution.
A Word on Safety
Kitchen activities with toddlers require real supervision — not anxious hovering, but genuine presence. The goal isn’t to eliminate risk; it’s to manage it sensibly while letting children work with real tools and materials.
A few non-negotiable principles:
Teach knife safety before using any cutting tool. Before any cutting activity, establish: “The blade goes toward the food, never toward fingers. We hold the food with fingers curled.” Demonstrate slowly. Repeat every time. Don’t assume they remember.
Hot surfaces are off-limits until they understand “hot.” Most 2-year-olds understand hot conceptually but haven’t yet developed the instinct to move away quickly. Keep toddlers well away from hobs and ovens. As they get older (3.5-4), they can begin to understand “we never touch this without asking.”
Watch for fatigue. A tired toddler is an unfocused toddler. Concentration lapses mean accidents. Kitchen activities are best when children are well-rested and genuinely interested — not when they’re hungry, tired, or doing it because you needed them occupied.
The right tools matter. A crinkle cutter is safer than a regular knife. A child-sized grater with a guard is safer than sharing yours. This isn’t about fear — it’s about giving children tools that are sized and designed for their hands and skill level.
Accept that it’ll be messy. A tray on the counter. A smock on. An expectation of spills. If you’re tense about the mess, they’ll pick that up. The mess is evidence of work. Sweep it up together when you’re done.
How to Start (Without Overwhelming Yourself)
Don’t try to implement all ten activities this week. Pick one that fits naturally into what you’re already doing:
- If you make salad: tearing lettuce (activity 3) is a 5-minute addition
- If you eat breakfast together: pouring milk from a small jug (activity 2) is a natural start
- If you bake: measuring dry ingredients (activity 8) requires almost no extra effort
The key Montessori principle here is the prepared environment: have the tools at child height, have a defined space (a section of counter, a step stool position, a tray), and make it clear that this is their role in the kitchen preparation.
Once one activity is established and feels normal, add another. You’re building a habit, not installing a programme.
FAQ
What age can toddlers start helping in the kitchen?
From around 12 months, children can begin with simple sensory activities: washing vegetables, stirring dry ingredients, handing you items. Purposeful food preparation — spreading, cutting with appropriate tools, measuring — becomes accessible from about 18-24 months. By age 3-4, children can contribute meaningfully to most simple meal preparation with supervision.
Are real knives safe for toddlers?
Not regular knives, but child-appropriate cutting tools are suitable from age 2+. A crinkle cutter, a butter knife for spreading, and later a purpose-designed children’s knife like the Opinel Le Petit Chef (age 3+) are all appropriate with supervision. Teach blade safety explicitly before introducing any cutting tool. Supervision is required throughout.
My child keeps trying to touch the hob. How do I handle it?
Use clear, consistent language: “The hob is hot. We never touch it.” Don’t say “be careful” (too vague). Be specific and predictable. Some parents use a visual signal — a red card or a line of tape on the floor — to indicate the hot zone. Consistent boundaries are more effective than repeated warnings. As children get older (3.5+), they can begin to understand and self-regulate around kitchen hazards.
Do I need a learning tower? They’re expensive.
No — a sturdy step stool works. The advantage of a learning tower is that it has guardrails on all four sides, so your child doesn’t tumble off while they’re focused on the task. If you have a child who tends to lose their balance or leans unexpectedly, the safety rails are worth the investment. If they’re steady and careful, a good step stool is fine. Don’t buy anything until you’ve tried the kitchen activities for a few weeks — you’ll quickly know whether they need the upgrade.
How do I handle it when they insist on “helping” when I’m in a rush?
This is the real challenge. A child who wants to help at exactly the moment you need to get dinner on the table in 10 minutes is testing every Montessori ideal you have. Some strategies: have a low-commitment task ready (“Can you wash these carrots while I get the pasta on?”), keep a small bowl of dry pasta or lentils as a sensory “kitchen activity” they can do independently, or be honest — “I’m in a hurry right now. Tomorrow morning we can cook together slowly.” Children understand more than we expect when we explain honestly.
Can kitchen activities replace screen time?
They can become part of the same moment — the afternoon slot when you’d otherwise hand over a device. Cooking is engaging, purposeful, and time-limited (dinner will be ready eventually). Many parents find that regular kitchen involvement naturally reduces the desperation for screens, because children have an alternative that feels meaningful rather than passive. It won’t work every day, and that’s fine too.
Where curiosity leads, learning follows. ✨
 Get weekly Montessori tips
Honest reviews, activity ideas, and budget-friendly picks — no spam, just what works.
Subscribe Free