Montessori Water Activities for Toddlers: Practical Life Without the Chaos
Water is one of the easiest Montessori materials to get wrong at home.
Not because children dislike it. Usually the opposite.
Toddlers love water. They pour too much, squeeze too hard, splash with their whole body, and somehow turn one tablespoon of water into a kitchen-floor event.
That does not mean water work is too chaotic for home. It means the setup needs to be smaller, calmer, and more realistic.
Montessori water activities are practical life activities. They are not just “sensory play with a Montessori label.” The point is to help your child join real home life: drinking, washing, wiping, watering plants, caring for flowers, cleaning a table, and learning what to do when water spills.
This guide gives you simple toddler-friendly water activities, how to present them, what to buy if you need materials, and how to keep the whole thing from becoming one more job for an already tired adult.
Safety note: Water activities need active adult supervision. Use shallow water, non-slip surfaces, child-sized tools, and avoid hot water, glass, sharp tools, toxic plants, tiny loose parts, and anything your child may mouth or misuse.
Why water work belongs in Montessori practical life
Montessori practical life is built around real tasks with real purpose.
Water fits that beautifully.
Your child sees you fill glasses, wash hands, wipe counters, rinse fruit, water plants, and clean spills every day. These are not pretend skills. They are family-life skills.
When you make one of those tasks small enough for a toddler, several things happen at once:
- the hand learns control
- the eyes track movement and quantity
- the body learns balance while carrying
- the child learns sequence
- cleanup becomes part of independence
- concentration grows because the work has a visible result
Pouring from one tiny pitcher to another looks simple, but it asks for a lot. Your child has to hold the handle, judge the angle, stop before overflow, return the pitcher upright, notice drops, and wipe them.
That is fine motor work, gross motor control, attention, and responsibility in one quiet activity.
The best part is that water work naturally teaches limits. Too much water spills. A full pitcher is heavy. A wet cloth needs squeezing. A plant only needs a little drink.
You do not have to explain every lesson. The material gives feedback.
Takeaway: water work is not a side activity. It is one of the most practical ways to build independence at home.
The simple setup that prevents most mess
The most common mistake is offering too much water.
For a toddler, “a little” usually means less than an adult expects. Start with a few tablespoons. If your child is younger or new to pouring, use even less.
A good first setup includes:
- one small pitcher or creamer
- one small cup or bowl
- one tray, towel, or waterproof mat
- one sponge or cloth
- a clear place to pour used water
That is enough.
You do not need a beautiful shelf, matching baskets, or a full practical life set. You need a contained space and a cleanup tool.
If you are buying one item, choose a pitcher that your child can actually lift. A tiny stainless steel pitcher, such as this child-sized Montessori pouring pitcher, can work well because it is sturdy and light. A small glass creamer can also work for older, careful children if you are comfortable supervising glass.
For many families, a small milk frothing pitcher from a kitchen shop is just as useful. Montessori does not require branded materials. The right material is the one your child can use successfully.
Keep these details in mind:
- Size: your child should be able to lift the pitcher with one or two hands.
- Capacity: small is better at first. Refill more often if needed.
- Spout: a clear spout helps the water flow predictably.
- Weight: metal is forgiving; glass gives visual feedback but needs more care.
- Handle: a handle can help, but some children do better with a small handless creamer.
Put a cloth on the tray before you begin. This reduces noise, absorbs tiny spills, and makes the activity feel calmer.
Then add the most important material: a sponge.
The sponge should be present before the spill happens. That quietly tells your child, “Spills are part of this work. We know what to do.” If water work is turning into a daily routine, a few child-sized cleaning tools make the cleanup loop much easier.
Takeaway: start with tiny quantities, real tools, and cleanup built into the activity from the beginning.
How to present water activities without over-talking
Toddlers do not need a lecture before water work.
They need a slow demonstration.
Choose one activity. Set it up completely before inviting your child. Then show the movement with fewer words than feels natural.
For pouring, it might look like this:
- Carry the tray slowly to the table.
- Place one hand on the pitcher handle and one hand underneath if needed.
- Pour a small amount of water into the cup.
- Pause before the cup is full.
- Return the pitcher upright.
- Notice any drops.
- Wipe the tray with the sponge.
- Squeeze the sponge into the empty bowl or sink.
- Invite your child to try.
The pause matters. Many toddlers pour until the container overflows because nobody has shown them the stopping point slowly enough.
Resist the urge to narrate everything.
Short phrases are enough:
- “Watch.”
- “A little water.”
- “Stop.”
- “Now wipe.”
- “Your turn.”
If your child spills, try not to jump in with alarm. A spill is information. Point to the cloth or sponge and show the first movement again.
If they deliberately dump the whole pitcher, the activity may be too exciting, too full, or too new. End calmly and offer a simpler version another day.
That is not failure. That is observation.
Takeaway: present one slow sequence, then let your child practice. The cleanup is part of the lesson.
12 Montessori water activities for toddlers
You do not need to offer all of these. Choose one or two that match your child this week.
Water work improves through repetition, not novelty.
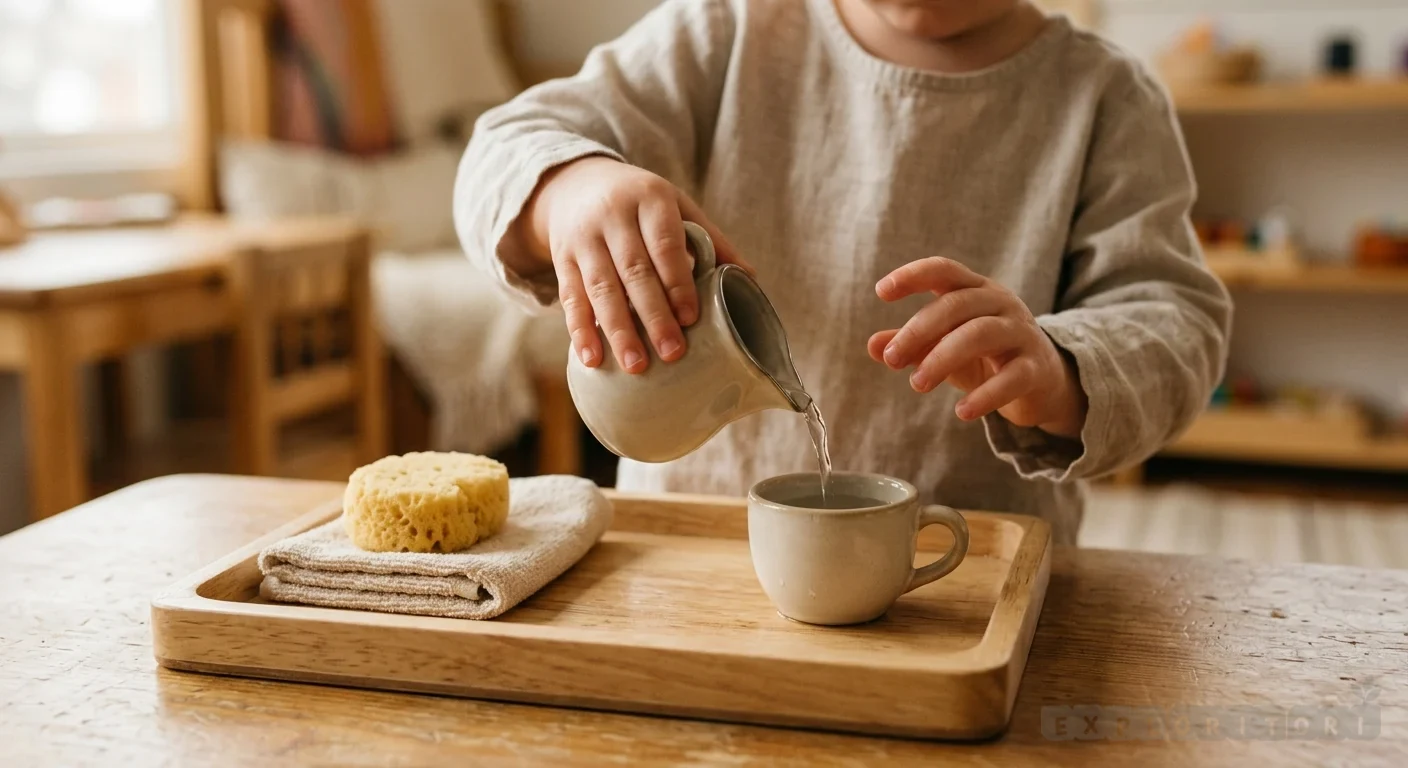
1. Pouring from pitcher to cup
This is the classic first water activity.
Use one small pitcher and one small cup. Add only a little water to the pitcher. Show your child how to pour, stop, set the pitcher down, and wipe any drops.
For younger toddlers, use a wide cup. For older toddlers, use a narrower glass or a second small pitcher.
This activity prepares your child for self-serving water at snack or meals.
2. Pouring from pitcher to pitcher
Once your child understands basic pouring, offer two matching pitchers or creamers.
Pouring from one spouted container to another gives clear feedback. If the stream misses, your child can see exactly what happened.
Keep the pitchers small and the water shallow. This is precision work, not a test of strength.
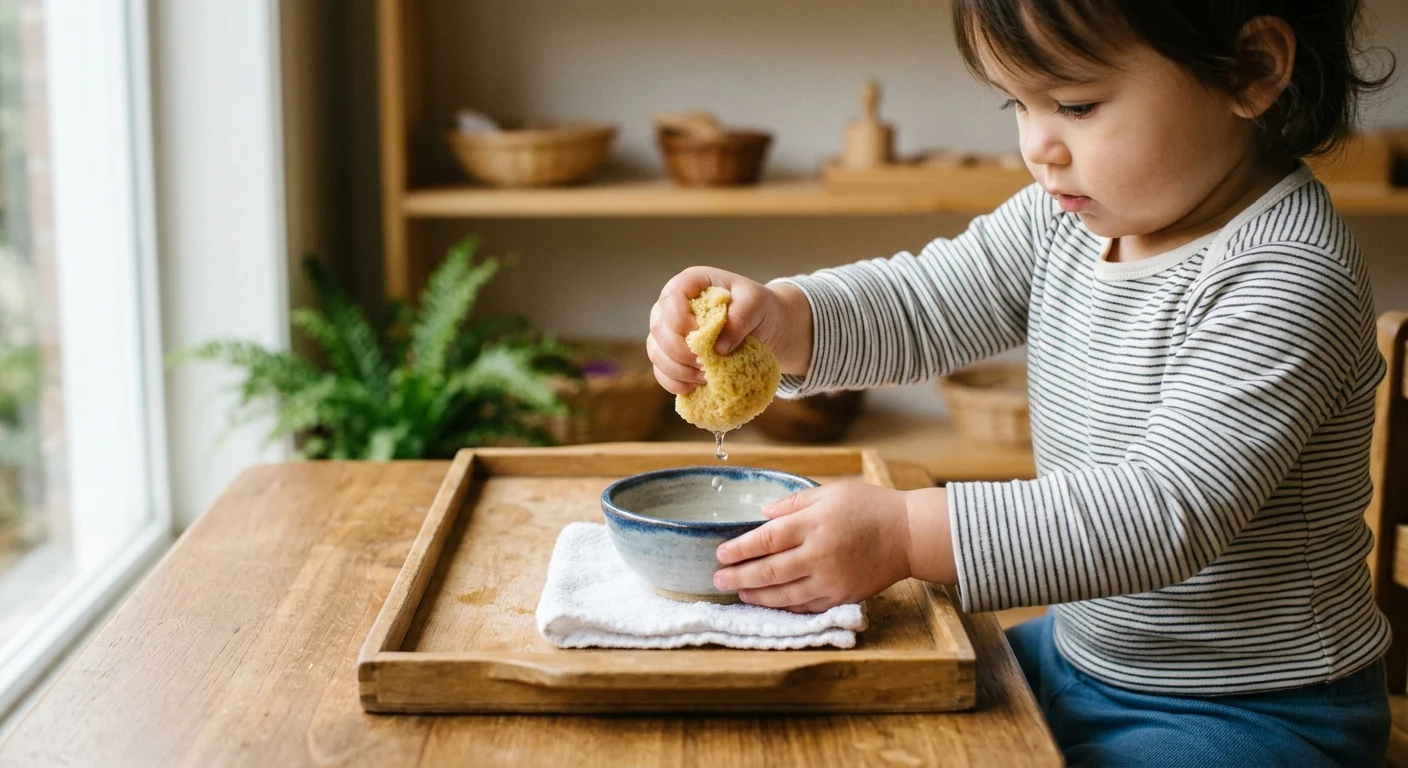
3. Sponge squeezing
Fill one small bowl with a little water. Place an empty bowl beside it. Add one sponge.
Show your child how to dip the sponge, lift it slowly, squeeze it over the empty bowl, and return it.
This builds hand strength and control. It also teaches the cleanup movement they will need after future spills.
A soft natural sponge is lovely, but an ordinary kitchen sponge cut in half works too.
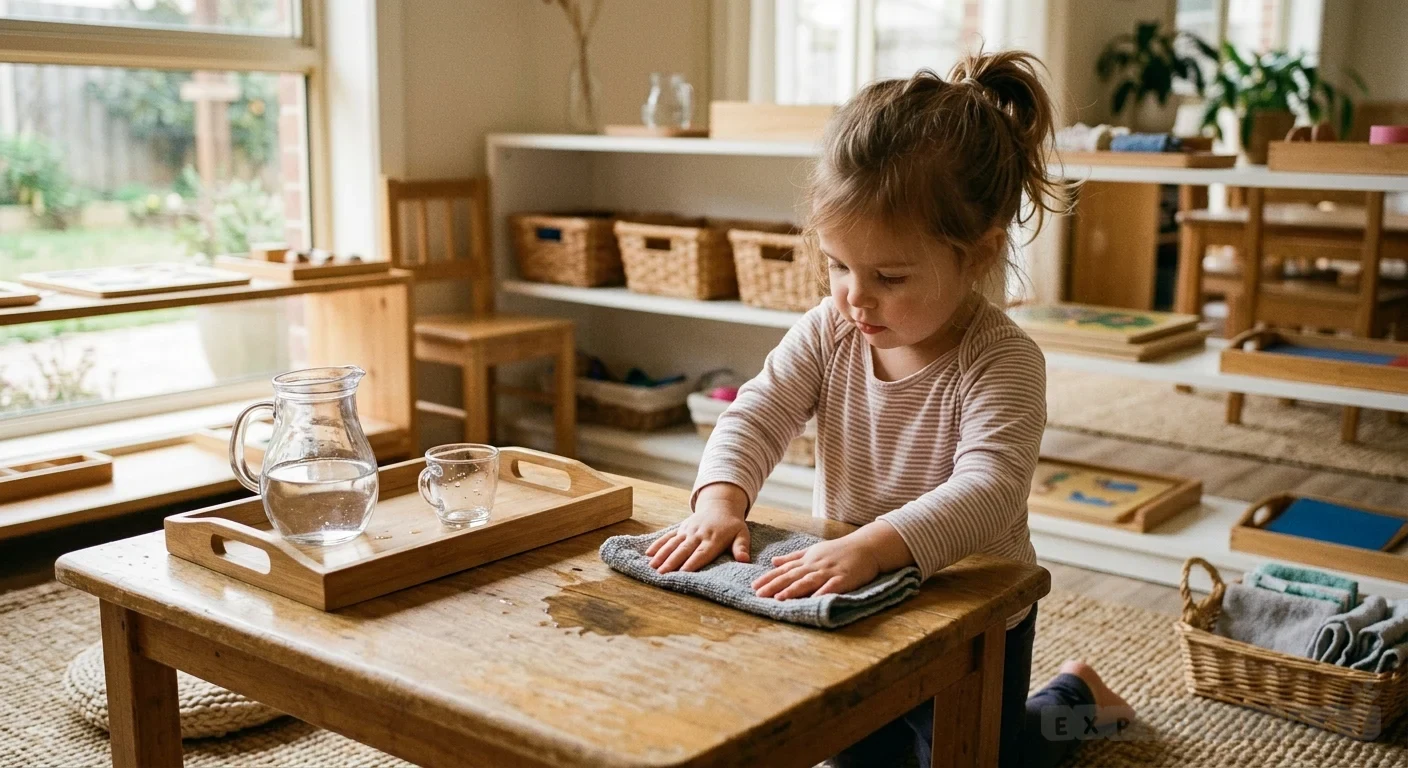
4. Wiping a table
This is one of the most useful home activities.
Give your child a small damp cloth. Show one slow wiping pattern: left to right, top to bottom, or circles. Keep the surface small at first, such as a placemat, low table, or tray.
The goal is not a spotless table. The goal is purposeful movement and participation.
If your child only swirls water around, reduce the amount of water in the cloth and show how to wring it out.
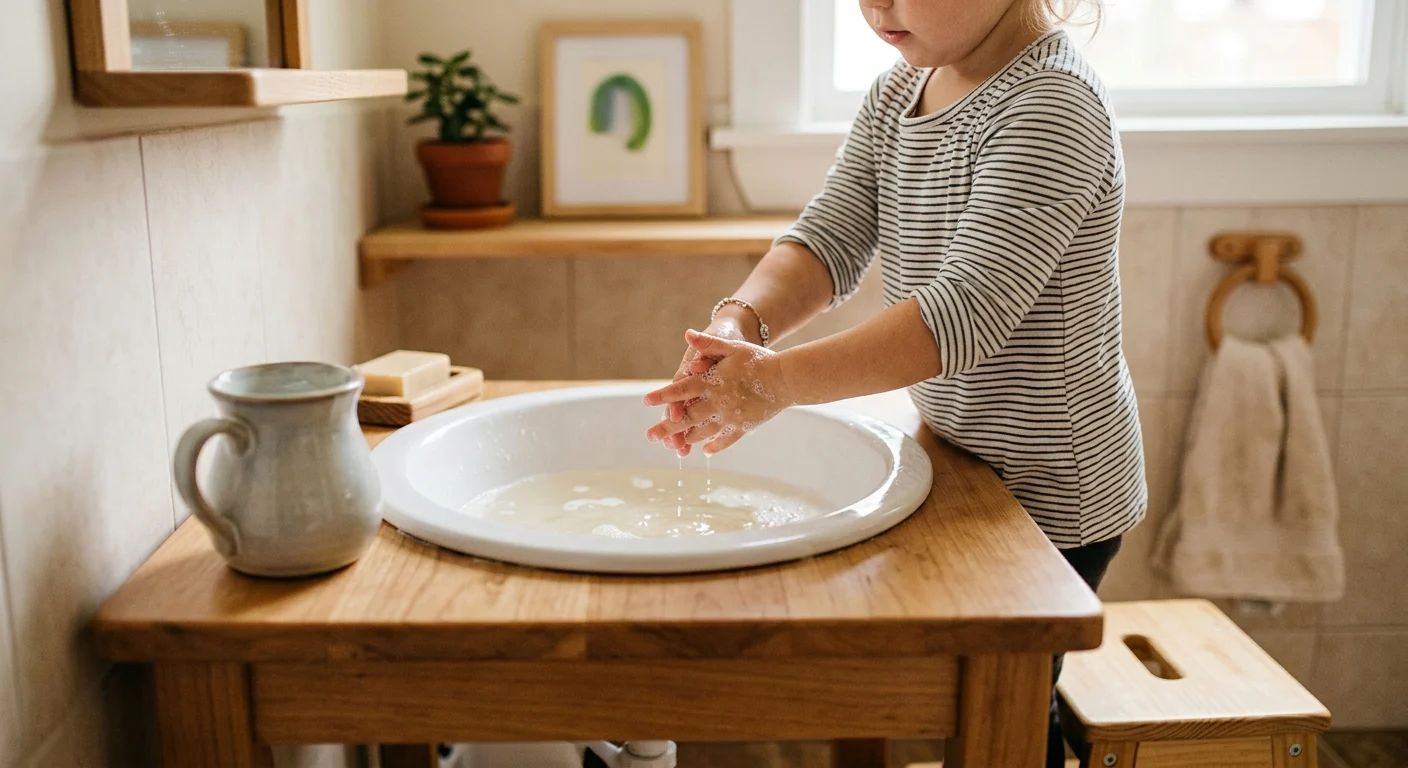
5. Washing hands at a low basin
If your bathroom setup is not toddler-friendly yet, a low basin can be a good bridge.
Use a shallow bowl, a small jug of water, soap if appropriate, and a towel. Show the sequence slowly: wet hands, rub, rinse, dry, hang towel.
This is practical life at its best because it connects directly to daily care.
If your child tends to play endlessly in the water, keep the basin very shallow and offer handwashing at predictable moments, such as before snack.
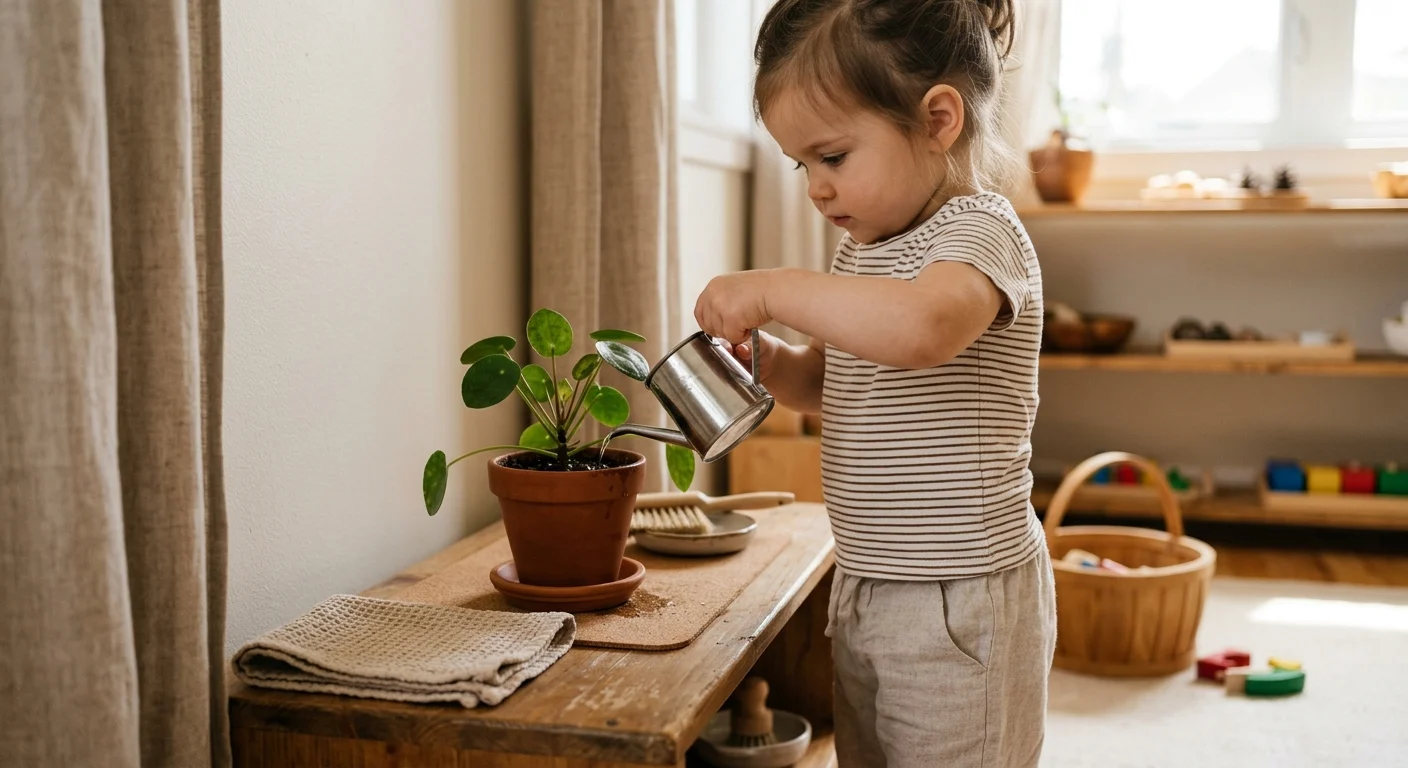
6. Watering one plant
Start with one hardy plant and a tiny watering can or pitcher.
Show your child how to touch the soil, pour a little water near the base, and stop. This is a beautiful exercise in restraint because more is not always better.
Choose a plant that can survive toddler enthusiasm. Avoid toxic plants, heavy pots, and anything you would be upset to lose.
7. Flower arranging
Flower arranging is often easier than it looks.
Offer a few short stems, a small vase, a tiny pitcher of water, and a towel. Your child can pour water into the vase, place flowers inside, and carry the arrangement to a table.
For younger toddlers, pre-cut the stems and use sturdy flowers. For older toddlers and preschoolers, you can introduce trimming with close supervision and child-safe scissors.
The beauty of this activity is that the result becomes part of the home.
8. Washing a cloth
Use a small basin, one cloth, and a tiny amount of water.
Show your child how to press the cloth into the water, rub it gently, squeeze it, and hang it to dry.
This is a good activity for children who love water but need something more purposeful than splashing. The sequence is clear and the material changes visibly.
9. Washing toy animals or figures
Choose washable figures that are large enough and safe for your child.
Offer a small basin, a brush or cloth, and a towel. Show how to wash one animal, dry it, and place it in a basket.
This can tip into pretend play quickly, which is fine, but keep the setup simple if your goal is practical life concentration.
Avoid tiny figures, anything with batteries, or toys that trap water inside.
10. Rinsing fruit
At snack time, invite your child to rinse berries, grapes cut according to your family’s safety rules, apples, or other fruit.
Use a small colander or bowl and a little water. Show how to rinse, shake gently, and place the fruit on a towel or plate.
This connects water work to food preparation, which often feels more meaningful to toddlers than a shelf activity.
11. Refilling a small drinking pitcher
This works best once your child can pour with some control.
Keep a tiny pitcher on a low shelf or snack station with only a small amount of water inside. Your child can pour a drink during snack and return the pitcher to its place.
If you already have a snack station, this pairs well with our Montessori snack station guide.
Do not start with a full jug. A small amount gives your child a real chance to succeed.
12. Cleaning a spill
This one sounds too ordinary, but it may be the most important water activity of all.
When water spills, calmly say, “Let’s get the cloth.” Show how to press, wipe, squeeze if needed, and check the floor.
Try not to turn cleanup into shame. In Montessori, spills are not moral failures. They are part of learning control.
If your child starts spilling on purpose just to wipe, offer a planned wiping activity later and keep drinking water away for the moment.
Takeaway: water activities work best when they connect to real routines: snack, plants, washing, cleaning, and care of the home.
What to put on a Montessori water shelf
A water shelf does not need to be available all day.
For many toddlers, it is better to bring out one water activity during a specific window: after breakfast, before lunch, during afternoon play, or while you cook nearby.
If you do keep water materials accessible, keep them dry until use.
A simple shelf might include:
- a small tray
- a small pitcher
- one cup or bowl
- a folded cloth
- a sponge
- a tiny watering can
- a basket for clean cloths
You can also keep a low hook for a towel and a small basket for wet cloths.
For transfer work beyond pouring, child-sized tongs can be useful later. A simple set of small wooden tongs can support dry transfer first, then wet sponge or cloth work when your child has more control.
But do not rush tools.
Hands come first. Then spooning. Then pouring. Then squeezing. Then more precise tools.
If your shelf is already full, do not add water work as another permanent choice. Rotate it in. Water is exciting enough that it can take over the room if it is always available before your child is ready.
Takeaway: a good water shelf is simple, dry between uses, and tied to adult availability.
How to handle spills, dumping, and overexcitement
Some children approach water work with immediate focus.
Many do not.
If your toddler dumps, splashes, or floods the tray, look at the setup before assuming they are being difficult.
Ask:
- Was there too much water?
- Was the container too large?
- Was the activity too open-ended?
- Was cleanup clearly part of the sequence?
- Was my child tired, hungry, or seeking big movement?
- Was I hoping for calm shelf work when my child needed outdoor play?
Water can be regulating, but it can also be overstimulating. If your child is in a wild mood, a tiny pouring tray may not be the right match.
Try one of these adjustments:
- reduce water to one or two tablespoons
- switch from pouring to wiping
- use a sponge instead of a pitcher
- move the activity outside or to the bath
- offer it after gross motor play
- sit closer and present the sequence again
- end after one successful round
Ending early is allowed.
You can say, “Water work is finished. We’ll try again tomorrow,” without making it dramatic.
If your child is upset, keep the boundary calm. The activity is not available right now. The relationship is still safe.
Takeaway: most water chaos improves when you reduce quantity, simplify the sequence, and treat cleanup as normal.
A simple weekly rhythm for water work
If you are not sure where to start, use a rhythm instead of a giant activity list.
Here is a gentle week:
- Monday: pouring from pitcher to cup
- Tuesday: wiping a table after snack
- Wednesday: sponge squeezing between two bowls
- Thursday: watering one plant
- Friday: rinsing fruit for snack
- Saturday: washing toy animals outside or in the bath
- Sunday: flower arranging or cloth washing
Repeat the same rhythm for two or three weeks before changing everything.
Toddlers do not need a brand-new tray every morning. Repetition is what turns water work from novelty into skill.
If your child loves one activity, keep it. If they ignore one, remove it and try again later.
You can connect this rhythm to a broader shelf plan using our Montessori toy rotation guide or shelf ideas by age.
The goal is not to run a miniature classroom. The goal is to make everyday home life easier to join.
Takeaway: repeat a few water routines until your child owns the sequence. Then add variety.
Final thoughts
Montessori water activities do not have to be precious.
They can be as ordinary as wiping a table, rinsing fruit, watering a plant, or learning to pour a small drink without panic.
Start smaller than you think. Use less water. Keep a cloth nearby. Show the movement slowly. Let your child repeat it.
And when the spill happens, because it will, treat it as part of the work.
That calm response is often the real Montessori lesson: mistakes are manageable, the environment can be restored, and your child is capable of helping.
 Get weekly Montessori tips
Honest reviews, activity ideas, and budget-friendly picks — no spam, just what works.
Subscribe Free