Montessori Snack Station for Toddlers: A Simple Setup That Builds Real Independence
A Montessori snack station sounds like one of those internet ideas that looks lovely in photos and turns into crushed crackers on your floor.
Sometimes it does.
But when it is set up well, it becomes one of the most useful practical life systems in your home.
Your child learns to notice hunger, pour water, carry a plate, make a simple choice, and clean up a small spill without turning to you for every step. That is real independence. Not staged independence. Not “helping” for thirty seconds before you take over.
And the best part is that a snack station does not need to be big, fancy, or Pinterest-perfect. It just needs to be clear enough that your toddler can actually use it.
This is exactly why I think it is the best topic for today. Competitors are winning with calm, saveable home systems parents can use tomorrow morning. A snack station sits right in that sweet spot: practical, evergreen, and deeply Montessori without being precious.
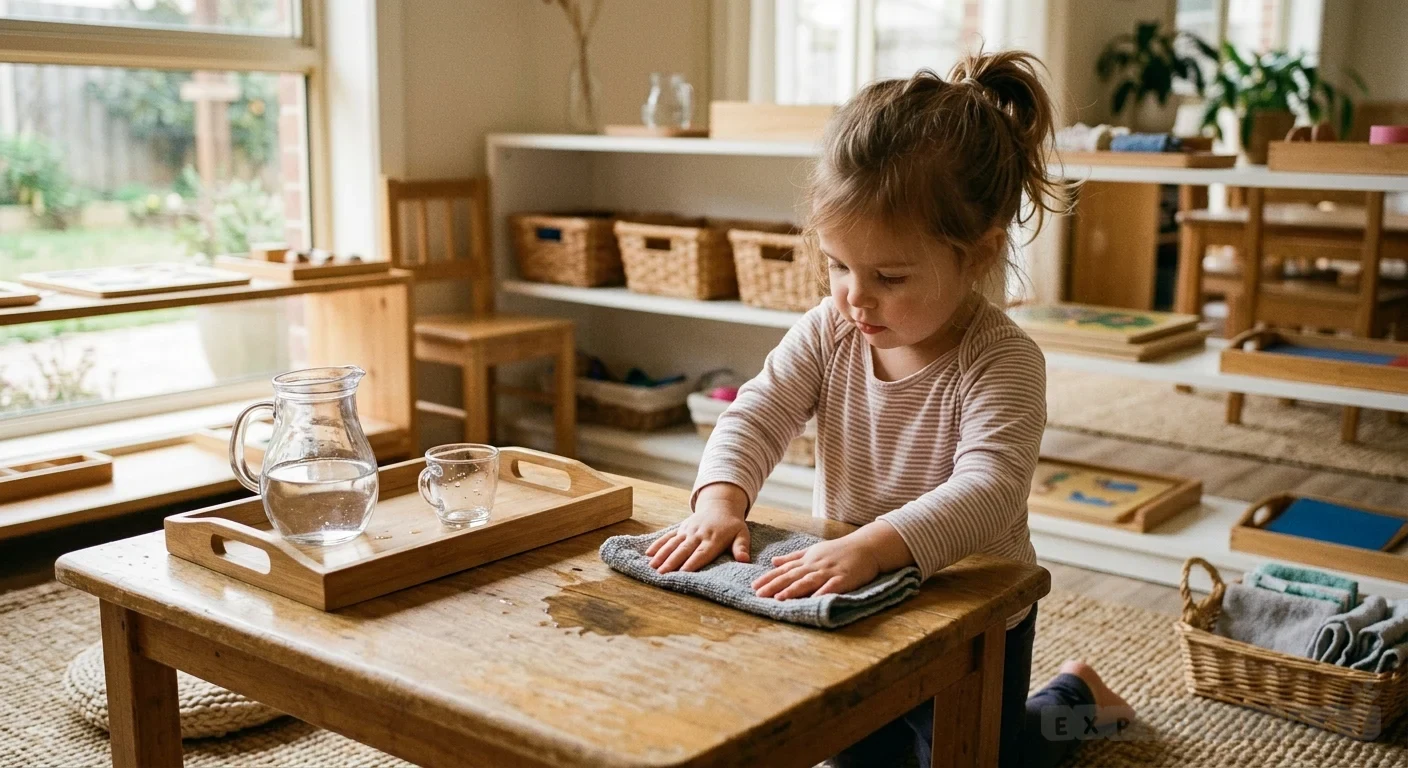
🌿 What a Montessori snack station actually is
A Montessori snack station is a child-accessible place for simple food and drink routines.
Usually that means your toddler can:
- get a cup or plate
- pour a little water
- choose a simple snack
- sit down and eat
- clear the dish or wipe a small spill afterward
That is the core idea.
It is not an all-day buffet. It is not a toddler vending machine. And it is definitely not a setup where you leave six open containers of berries within reach and hope for inner peace.
Montessori works because the environment makes the right action easier.
So a good snack station gives your child just enough freedom to succeed:
- reachable tools
- manageable portions
- clear boundaries
- predictable cleanup
That is why this setup supports more than hunger.
It builds order, coordination, sequencing, and confidence. A child who can pour their own water and wipe the table after snack is doing practical life in the purest Montessori sense.
If you are new to this way of thinking, our guides on how to start Montessori at home and Montessori practical life activities are the bigger-picture version. If your goal is a whole self-care rhythm, snack access also pairs well with Montessori dressing skills and routine cards for toddlers.
Takeaway: a Montessori snack station is less about food storage and more about giving your child a small, usable routine they can own.
🪑 The best place to put it
The best location is not the cutest one.
It is the one your child can reach, use, and reset without causing chaos in the rest of the kitchen.
For most homes, one of these works best:
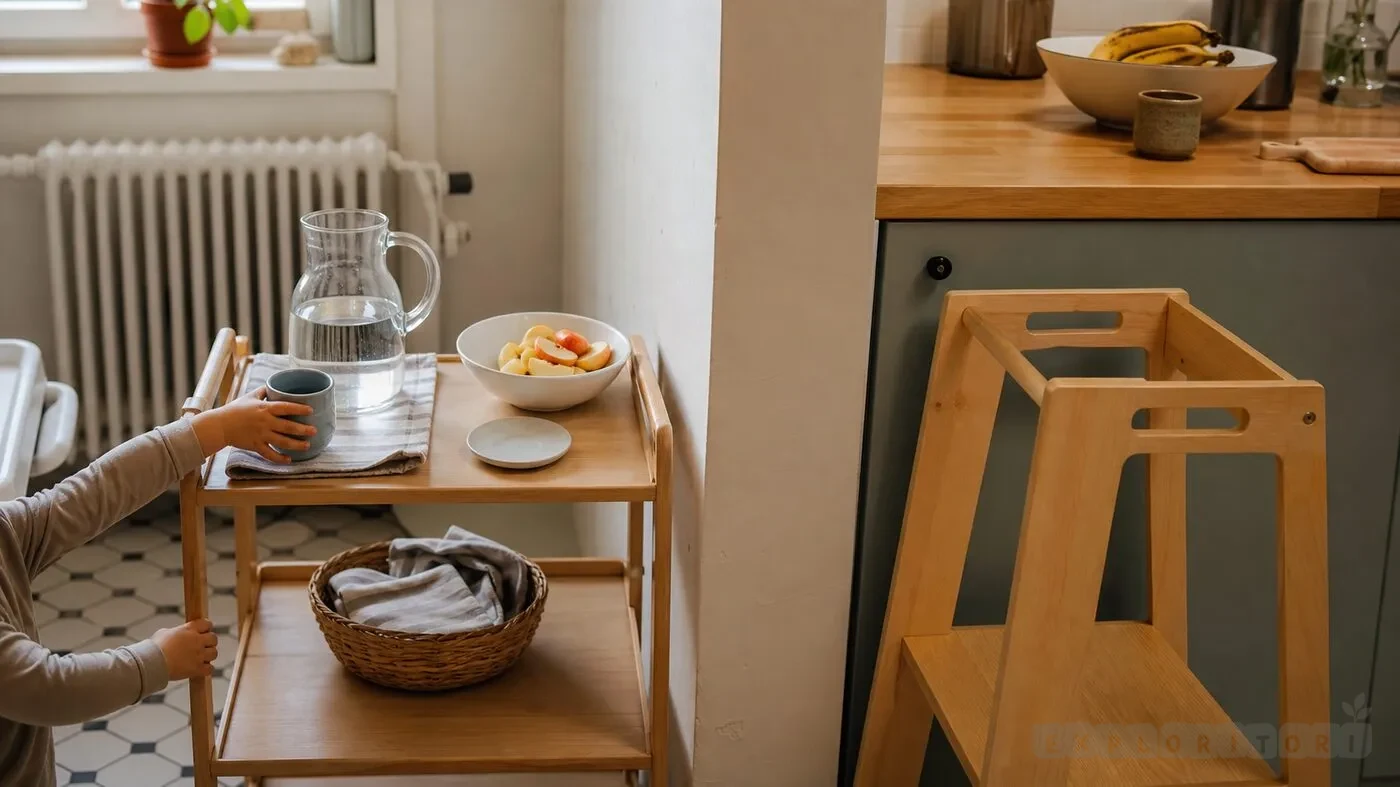
A low cart
A small rolling cart is brilliant because it creates a defined zone. The classic example is the IKEA RÅSKOG style setup we mentioned in our IKEA Montessori hacks guide.
A three-level cart works well because each layer can have one job:
- top: water setup
- middle: snack choices
- bottom: plates, napkins, crumb brush, or cloth
One low shelf in the kitchen
If you already have a low shelf or cube unit, you do not need another piece of furniture. One reachable shelf can do the job beautifully.
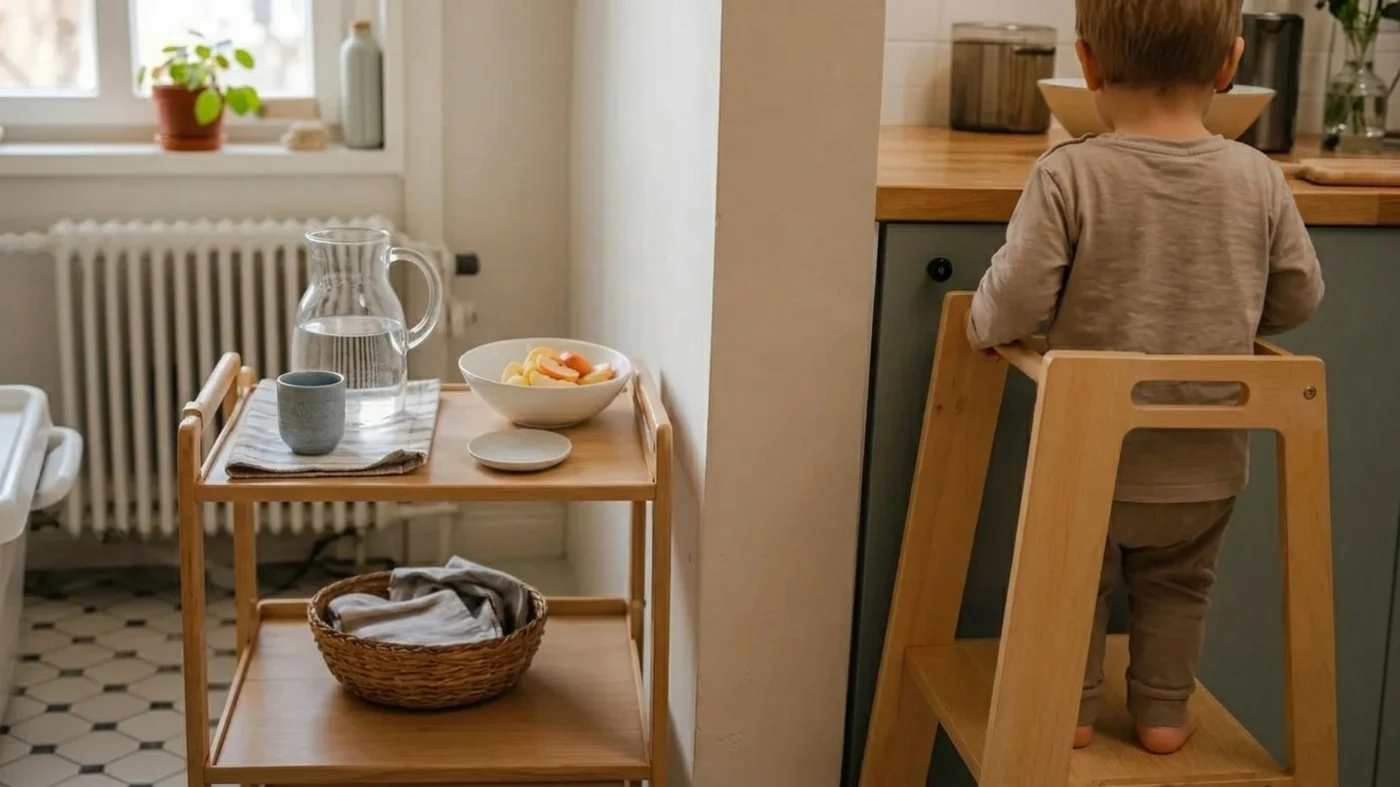
A small section of the counter, paired with a stool
If your child is older and already uses the kitchen with a stool or tower, you can create a semi-independent snack zone with supplies stored low and prep happening at counter height.
The real rule is simple:
Your child should not need to ask you where everything is, and they should not need to drag half the kitchen into the living room to make snack happen.
If you need safe counter access for fruit slicing, spreading, or simple prep, a proper toddler learning tower or the sturdier Guidecraft Kitchen Helper can be worth it if your child uses the kitchen daily.
If not, start lower and simpler.
Takeaway: the right spot is the one that reduces friction, not the one that looks most “Montessori” online.
🧺 What to put in a toddler snack station
This is where many parents accidentally overbuild.
You do not need labels, acrylic jars, bamboo everything, and twelve snack choices. In fact, too much choice is usually what breaks the setup.
A very workable starter snack station includes:
- one small pitcher or child-sized water dispenser
- one cup
- one small plate or bowl
- one or two napkins
- one cloth or sponge for spills
- one or two simple snacks
That is enough.
If you want to make the setup feel more readable, a tray helps a lot. These small wooden trays work well because they visually group the materials and contain minor mess. A deeper Learning Resources serving tray is especially good if your child is still in a heavy pouring-and-spilling phase.
Good first snack choices
Start with foods that are:
- easy to portion
- easy to hold
- not too sticky
- not too crumb-explosive
- safe for your child’s chewing skills
Good options often include:
- banana slices you prepare in advance
- crackers
- cucumber rounds
- cheese cubes
- apple slices for older toddlers
- dry cereal in small amounts
The point is not nutritional perfection in one tray.
The point is success.
When a setup works, you can expand it later.
What not to include at first
Skip these in the early version:
- large containers your child cannot lift
- foods in difficult packaging
- too many choices
- sticky foods that require adult rescue
- big pitchers filled to the top
- snacks you do not actually want them accessing freely
This last one matters more than people admit.
Do not build a system that requires you to say no all day.
If gummies, raisins, or endless snack refills are going to become a battle, do not put them in the station.
Takeaway: build for clarity and success, not variety and visual styling.
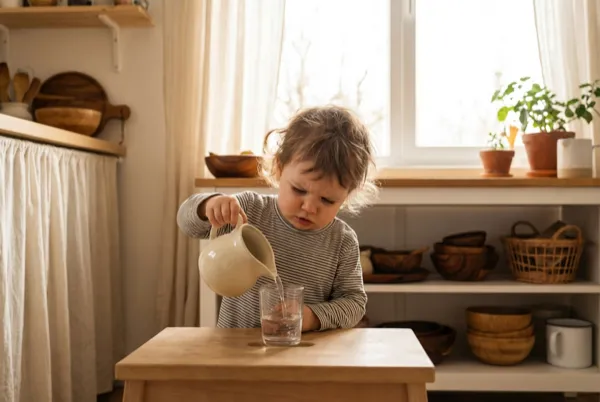
💧 Start with water before you start with food
If you only take one practical tip from this post, make it this one.
Start with water.
Not because water is magical. Because pouring is the skill that makes the rest of the snack station possible.
A child who can:
- lift a small pitcher
- pour a manageable amount
- notice when the cup is nearly full
- wipe a spill
is already learning the deepest part of the routine.
This is why so many Montessori practical life activities begin with pouring. It develops wrist control, attention, sequencing, and self-correction. Our Montessori kitchen activities guide goes deeper on that progression, and the Montessori water activities guide gives you a quieter water-work path if pouring is still the main skill.
A good starting sequence looks like this:
- Water only with a very small pitcher filled halfway
- Water + cup + sponge as a complete mini routine
- One dry snack option added after pouring feels familiar
- Simple prep later, like spreading or slicing banana
You do not need to rush to the “full” version.
In fact, the best snack stations usually grow in stages because your child’s ability grows in stages.
If you want an extra tool for older toddlers who are ready to help prepare snack, a Montessori kitchen knife set with crinkle cutter can be a nice next step for soft foods like banana, strawberry, or cucumber.
Takeaway: pouring is the foundation. Build that first and the rest gets much easier.
🍎 How to keep it Montessori instead of turning it into constant grazing
This is the part many parents worry about, and fairly enough.
You want independence. You do not want your toddler eating seventeen crackers between breakfast and lunch because freedom apparently tastes like beige carbohydrates.
Montessori is not permissiveness.
It is freedom inside a prepared structure.
That means your snack station still needs limits.
Useful boundaries that work well
Offer snack during a clear window
Maybe the station is open between breakfast and lunch, or only after nap, or only during the usual morning snack time.
You do not need all-day access if that does not fit your home.
Put out small portions
Offer enough for one snack, not enough for a minor festival.
Keep choices narrow
One or two options is plenty. Three at the absolute most.
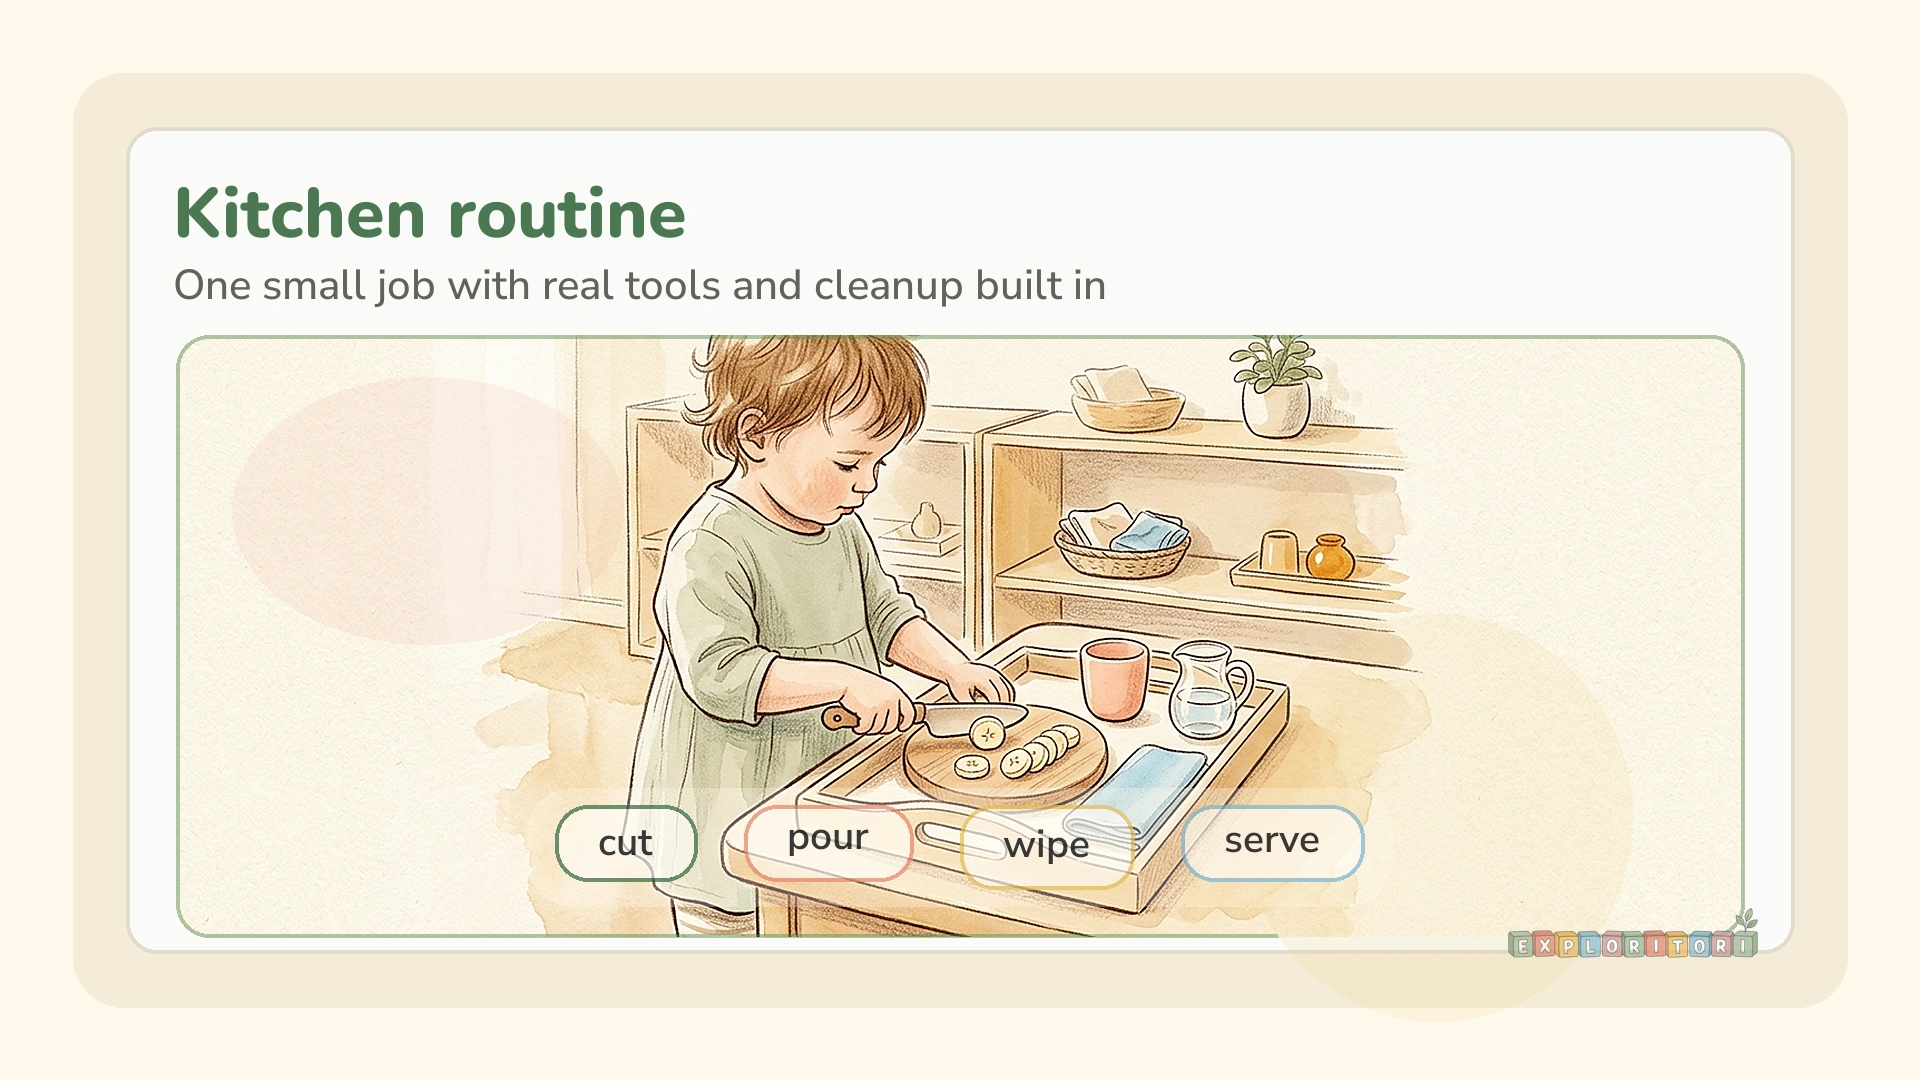
Teach the full routine
Snack is not just eating. It is:
- wash hands
- get plate or cup
- serve snack
- eat at the table
- clear dish
- wipe crumbs
That is what makes it Montessori. The routine matters as much as the food.
Refresh, do not endlessly refill
A snack station is not a negotiation surface. When the offered snack is gone, snack time is done or you reset it later.
This helps children experience structure without power struggles.
One reason I like this system so much is that it respects real hunger without making the adult the permanent snack gatekeeper. Your child starts to feel, “I can do this,” instead of, “I need someone to open, pour, choose, hand, and clean every step.”
Takeaway: a Montessori snack station works best when freedom is real but limited, visible, and predictable.
🧼 How to make cleanup part of the setup
If cleanup is not built in from day one, the snack station will eventually feel like a trap you made for yourself.
The fix is very simple: put cleanup tools inside the station.
That usually means:
- a small cloth or sponge
- a hand brush or crumb brush
- a reachable bin or dish-return spot
- maybe a small placemat or tray underneath the work area
For toddlers who are ready to clean up small spills, keep the tools visible and boringly predictable.
When your child spills, you do not need to launch into a speech.
You just point to the cloth.
That is such a powerful Montessori move because it turns mistakes into part of the routine, not into a moral event.
Spilled water is not failure. It is work followed by repair.
That same logic shows up all through Montessori practical life:
- pour, then wipe
- snack, then brush crumbs
- wash hands, then hang towel back
If you want a broader version of this home philosophy, Montessori on a budget in small spaces is useful here. The setup does not need to be expensive. It just needs to let your child complete the whole loop.
A simple cleanup script
You can use the same calm language every time:
- “Water spilled. The cloth is here.”
- “Crumbs fell. Let’s brush them into the tray.”
- “Your plate is finished. It goes here.”
Short. Predictable. Not dramatic.
That predictability is what helps toddlers internalize the routine.
Takeaway: if cleanup lives outside the station, independence stays incomplete. Put the cleanup tools right there.
👶 What ages this works for
A snack station is not one-size-fits-all. It changes quite a lot by age.
15-18 months
Keep it tiny.
This age does best with:
- water pouring practice
- one cup
- one very simple dry snack
- adult close by
Think “intro to the routine,” not “independent self-serve kitchen.”
18-24 months
This is often the sweet spot for a simple station.
Many toddlers can:
- carry a cup carefully
- pour small amounts
- choose between two snacks
- use a cloth for spills
- bring their dish back when finished
This age is especially hungry for real work. If your child is in that phase, the snack station often lands beautifully.
2 to 3 years
Now you can often add:
- small food prep
- spreading
- slicing soft fruit
- more responsibility for reset and cleanup
This connects naturally with broader kitchen work and the practical life ideas in Montessori kitchen activities.
3+
Older toddlers and preschoolers can often manage a more complete setup, but the same rule still applies: do not add complexity faster than your child can use it well.
The best station is not the most advanced one.
It is the one your child can truly own.
Takeaway: adjust the station to your child’s real ability, not the version of them you hope appears by next Tuesday.
🚩 Common snack station mistakes
Most snack station failures are not philosophical failures. They are setup failures.
Here are the big ones.
1. Offering too much
More options usually means more confusion, more requests, and more mess.
2. Starting with difficult food
If the snack requires peeling, twisting, prying, or adult-level jaw work, the station stops being independent.
3. Filling the pitcher too high
This is the easiest mistake to fix. Half full is plenty.
4. Forgetting the cleanup tools
Then you become the cleanup system, which defeats the point.
5. Expecting perfection immediately
A snack station is a skill-building space. Of course there will be spills, over-pouring, cracker avalanches, and suspiciously slow banana transportation.
That does not mean it is failing.
It means your child is learning.
6. Making it too aesthetic
This sounds silly, but it matters. If you are more attached to how the jars look than to whether your child can open them, the setup has drifted away from its purpose.
Montessori is not decoration.
It is usability.
Takeaway: when a snack station is not working, simplify before you give up.
❤️ What this changes in daily life
A good snack station does something subtle but important.
It shifts your child from passive recipient to active participant.
They are no longer just waiting for food to appear. They are practicing a sequence:
- noticing a need
- meeting it in a manageable way
- caring for the environment afterward
That is a very grown-up pattern in a very toddler-sized form.
It also changes your role.
You are still there. You are still guiding. But you are not the bottleneck for every tiny step.
And honestly, that is one of the most useful things Montessori offers at home. Not extra work for parents. Better-designed work.
If you are deciding where to invest effort in your home setup, I would put a snack station surprisingly high on the list. It links beautifully with kitchen participation, handwashing, practical life, and calm routine building. It is one of those rare Montessori ideas that is both philosophically sound and wildly practical on a Tuesday.
Start smaller than you think.
One cup. One little pitcher. One cloth. One snack.
Then let your child grow into the rest.
FAQ
What is a Montessori snack station?
A Montessori snack station is a child-accessible setup where your toddler can get water, choose a simple snack, use a plate or napkin, and help clean up with minimal adult help.
What age can a toddler use a Montessori snack station?
Many children can begin with a very simple version around 15 to 18 months, often starting with water pouring and one easy dry snack. Most toddlers can use a fuller snack station with supervision by age 2.
What should go in a Montessori snack station?
Start with a small pitcher or dispenser, one cup, a plate or bowl, napkins, one or two simple snacks, and a cloth or sponge for spills. Keep the setup small and easy to reset.
How do I stop a snack station from becoming a mess?
Keep portions small, offer only one or two snack choices, use containers your child can open, place a tray or mat underneath, and teach cleanup as part of the routine from the beginning.
Do I need special Montessori furniture for a snack station?
No. A low shelf, a small cart, or one reachable section of your kitchen is enough. Montessori works because the setup is accessible and clear, not because it is expensive.
Where curiosity leads, learning follows. ✨
 Get weekly Montessori tips
Honest reviews, activity ideas, and budget-friendly picks — no spam, just what works.
Subscribe Free